OPENTEXT DOCUMENTUM EDITION
Features
Screenshots
FAQs
Pricing
Trial Version
Documentation
VEEVA VAULT
EDITION
Features
Screenshots
FAQs
Pricing
Trial Version
Documentation
Many migration and upgrade projects involving the OpenText Documentum infrastructure compromise several steps that are difficult to execute by using only the standard/out-of-the-box tools provided with the various OpenText Documentum software infrastructure components.
Our OpenText Documentum administration software product dqMan offers specific functions that allow to facilitate the execution of particular tasks and, in some cases, to automate repetitive activities.
Here is a first selection of dqMan’s most useful features in the context of OpenText Documentum migrations. Stay tuned for the second blogpost!
Connecting to multiple environments at the same time can be accomplished by using profiles. This feature was developed with the idea that during a migration or upgrade project, one environment (e.g. DEV) may have already been migrated or upgraded while the rest of the environments (e.g. INT, SANDBOX, PROD etc.) might not have been modified yet. However, the person performing the activities should be able to connect to both the migrated and non-migrated environments simultaneously. A dqMan instance can be configured to connect to one or more repositories simultaneously, either from the same environment or from multiple environments.
Besides, it is also possible to configure dqMan to connect only to repositories from a specific environment (in order not to accidentally update values in the wrong environment).
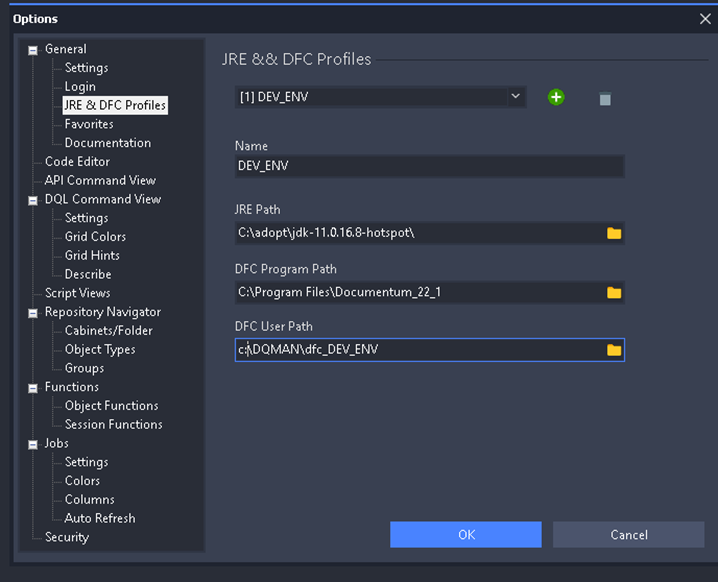
The use of dqMan profiles allows the Java version, DFC installation, and DFC user path to be set specifically for a particular environment. Thus, complete decoupling is possible when connecting to several different environments.
By the way, big plus: dqMan can now be configured to use a dark theme. This not only has a positive effect on power consumption, but above all is gentler on the eyes of the person running the migration or upgrade – especially taken into account that, e.g. in PROD, such tasks are usually done during intense work sessions.
1. Create profiles
You can set up profiles by clicking Extras in the menu and then Options. Next go to the General submenu and select the section JRE & DFC Profiles.

2. Start dqMan with profile
To run dqMan with a specific profile, you have to execute the command “dqMan.exe -profile %PROFILE_NAME%” afterwards, entering for example “dqMan.exe -profile DEV_ENV”.
As migration projects are highly stressful and performed with (multiple) users that have a limited number of bad passwords retries, the ability of saving the user/password combination per repository (and indirectly per environment) represents a great help. This way, the possibility to block a user because a wrong password was used (e.g. from a different user) is basically eliminated. The saved passwords can be deleted (if needed) after the migration/upgrade.
This feature is also extremely useful for cases where a smoke test is needed for multiple use cases since usually each use case to be tested requires a specific user. Since dqMan allows to save the user and password, the step of saving the user/password combination can be done before the actual migration thus allowing the user switching to be done very fast and without effort.
1. Enable the saving of passwords
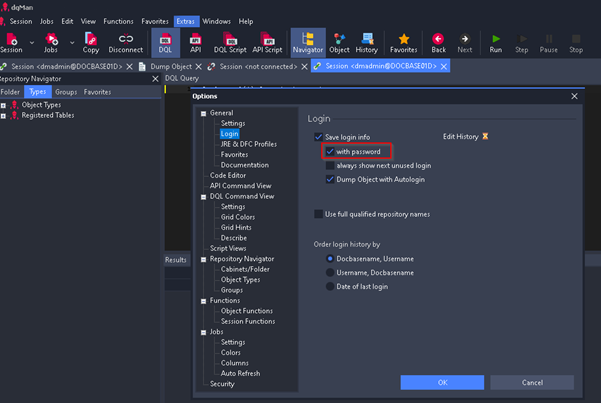
Saving passwords is disabled by default and must be turned on if required. To do this, open Extras in the main menu, select Options, then Login, activate Save Login Info and specify the option with password.

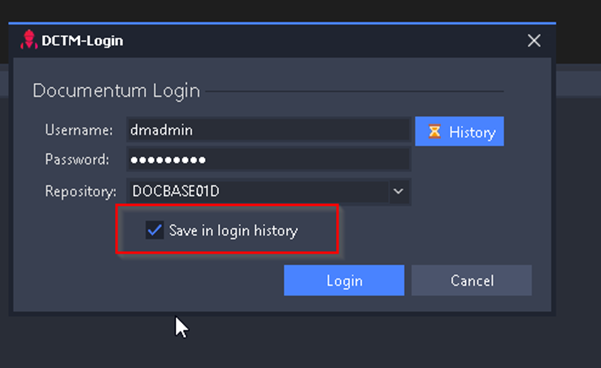
2. Specify the user, password, and repository that are to be saved

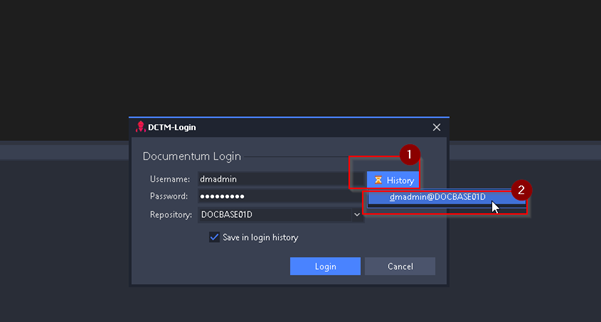
3. Connect using saved user/password combination to a specific repository
Please click on the History button on the Login screen and simply select the specific user to connect with. FYI: Multiple users (and their passwords) can be saved for the same repository.

What’s the benefit of accessing executed DQLs you ask yourself? As migration activities usually involve many repositories, the same actions, DQLs, and APIs need to be executed on each one – sometimes even in the same sequence. Providing histories of executed DQL and API commands that can be accessed easily thus helps you save valuable working time.
To view previously executed queries, access the main screen of the application. Below the DQL Query, you find the required History window. Double-clicking on the previously executed queries listed there will automatically add them to the DQL Query window, thus allowing to execute them again with ease (or copy-paste them in other sessions).
Thanks for reading our very first dqMan blogpost and remember to watch this space for our next blog episode!
Would you like to evaluate the value of dqMan’s benefits for your daily tasks? Request your 14-days valid trial now!

 Simplify your OpenText Documentum migration with dqMan – Part 2